“Services” entry consists of the following sub-menu entries/pages: 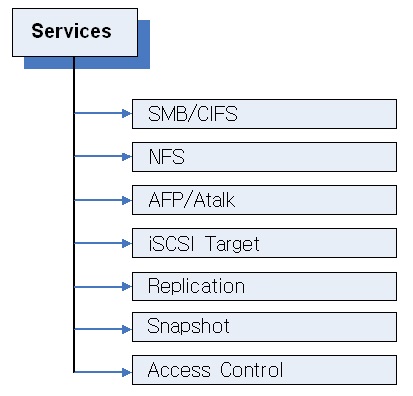
5.1 Service - SMB/CIFS page:
Windows Screen Sharing Service Management:
The SMB/CIFS Submenu allows access to settings in order to manage sharing on Windows-based systems. All Logical Volumes created on EliteNAS are automatically enabled for SMB/CIFS Service.
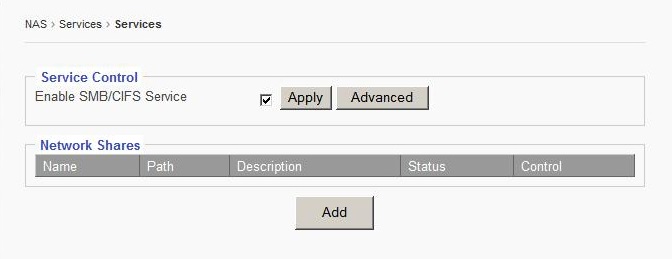
Service Control
Enable SMB/CIFS Service
Check “Enable SMB/CIFS Service” option box.
Click “Apply” to save changes.
Note: SMB/CIFS Service must be enabled for EliteNAS to share files on Windows-based systems.
Disable SMB/CIFS Service
1. Uncheck “Enable SMB/CIFS Service” option box.
2.Click “Apply” to save changes
5.1.1 Advanced
The “Advanced” button brings up additional options.
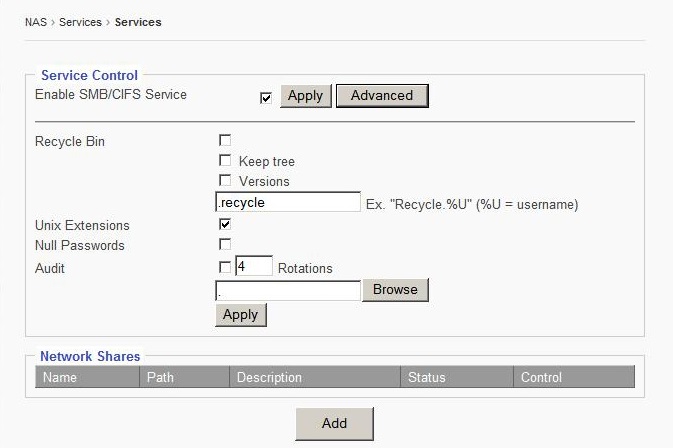
Advanced Options:
Recycle Bin
By checking this option box, the Recycle Bin function for SMB/CIFS client is enabled.
Keep Tree
This option specifies if a directory structure should be kept, or if deleted files should be categorized separately in the recycle bin.
Versions
This option lets two files with the same name exist simultaneously in the Recycle Bin. The newer file will be titled “Copy #x of ‘file name.’”
Recycle Bin Text Box
This box defined where deleted files will be saved.
Note: Even if recycle bin is enabled (default “.recycle”), files will not be saved unless the proper command is entered.
To save files to users recycle bin, manually enter ‘Recycle.%U” in the text box. User deleted files will be saved in the format “recycle.user#.” For example: User 1 deleted files will be saved in “recycle.user1.”
Unix Extensions
Unix file extensions allow user to support features such as: symbolic links, hard links, ect. This feature is enabled by default.
Important : On Mac OS 10.4.x and later versions, this feature must be turned off to avoid “ file access permission” issues on Mac clients running SMB protocol.
Null Password
This option allows SMB clients to log on without a password.
Audit
In the case of an audit log being greater than 10MB in size, it will be renamed “audit.log.1.” and begin looping to “audit.log.”
Rotations
The number entered into this text box dictates on how many rotations will be saved. For example, entering 4 into the box will result in log files being generated up to “audit.log.4.” Then the program will begin to overwrite “audit.log.1.”
Important: Changes in settings will not be saved unless the “Apply” button is clicked.
5.1.2 Shares
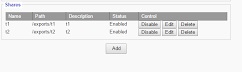
Disable
To disable a share, click the “disable button.” This will change the status column to show “disabled”
Delete
To delete a share, click the “delete button,” the share will no longer show on the “shares screen”
Edit
This button opens a menu where you can edit what is shared with each user. 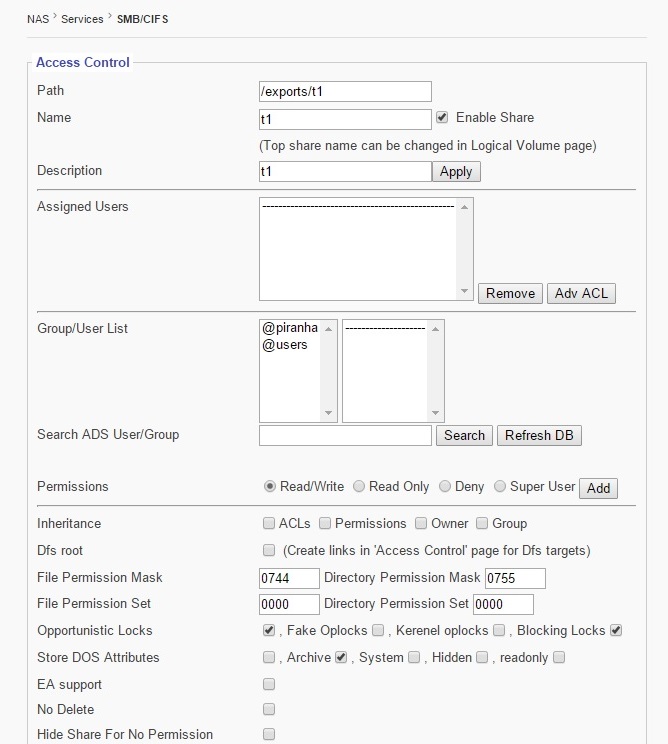
Path
Path lists the full path/location of a share.
Name
The text box allows you to name a share. There is also a check option box that lets you enable/disable the share.
Descriptions
This text box shows the description given to the share when created.
Group/User List
This window shows available Groups and Users that can be assigned access to certain shares.
Search
This text box allows one to search for a specific Group or User.
Permission
Use this option to assign share access rights to selected users. Use the “Add” Button to apply permission to a group/user.
Inheritance
Use this setting to apply ACL’s, permissions, owner and group properties to sub-folders and files created using the Inheritance option.
DFS Root
This option generates links on the Access Control Page for DFS Targets. Enables multiple NAS Aggregation for SMB/CIFS clients.
File Permission Mask
Sets default permissions for all files created after File Permission Mask option has been enabled.
Directory Permission Mask
The Directory Permission mask sets default permissions to all directories and/or folders created after enabling this option
File and Directory Mask Formats
A code is used with this format “0” followed by 3 numbers. (0XXX).
The first X refers to the owner of the file/directory.
The Second X refers to the group assigned to the file/directory
The third X refers to other users assigned to the file/directory
These numbers “X” Can take a total of 6 values.
4- Read Only
2- Write Only
1—Execute Only
5 (4+1) Read and Execute Only
6 (4+2) Read and Write Only
7 (4+2+1) Read, Execute, and Write
Example
0742
Owner has all rights
Group assigned can read only
Other groups can write only
Opportunistic Locks
This option is used to improve performance when multiple people or devices are accessing the same file on one network.
Note: This option is enabled by default.
Store DOS Attributes
Enable this option in order to run legacy MS DOS based programs.
Hide Files
Use this field to manually hide files on a share.
Host IP Blocking
This option is used to give permission or to deny access towards certain hosts, or range of hosts.
Allow
This option allows you to list all users who are allowed to access a share. All others will be denied access.
Deny
This option allows you to list all users who are not allowed access to the share. Those who are not listed will be granted access.
5.2 Service - NFS
This submenu houses the settings to control client access via the NFS Protocol 
Enable Service
This option enables NFS service.
Number of Daemons
Enter the correct number of Daemons
Shares
Path - shows the path/location of directory.
Options - Shows permissions set to each directory.
Status - Shows whether a NFS service is enabled.
Control - Use these controls to enable, disable, or to delete NFS shares.
5.2.1 Edit NFS Access Controls
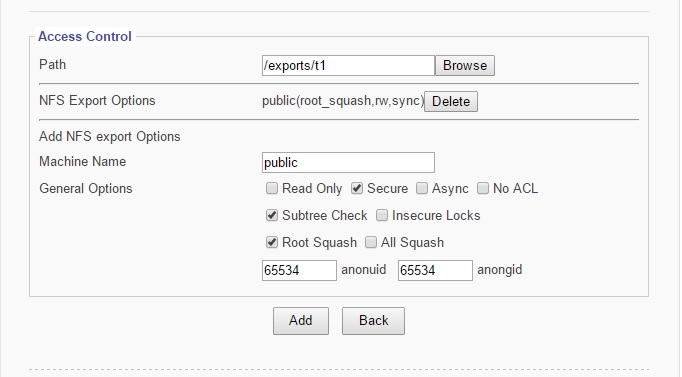
Machine Name
Sets NFS Export Name
General Options
Read Only - Limits users from writing new data or changing existing data.
Secure - Requires requests to be made on internet ports less than IPPORT_RESERVED (1024). To turn off this feature, check “Insecure Locks.” This must be disabled for access on Macintosh.
Async - This option allows NFS server to violate NFS protocol and reply to requests before the disk commits said request. This option usually is correlated with an increase in performance but can also cost data lost in the event of a hard server crash.
No ACL - On systems that do support ACLs, this option tells nfsd not to reveal ACLs to clients.
Note: No ACL option only has an effect when the system is patched to support ACLs. Safe for use by NFSv2 and NFSv3 clients.
Subtree check - this option enables or disables subtree checking. Although there are some security implications involved, reliability can improve in certain cases. This refers to the extra step that the server must take to check not only the accessed file, but also the exported tree.
Insecure Locks - This option tells the NFS Server to not require authentication of locking requests. No access checks will be performed if this option is selected.
Root Squash - Maps requests between the UID/GID 0 and the anonymous UID/GID.
All Squash - Maps everything between UID/GID 0 and anonymous user.
Anonuid and Anongid - Explicitly set the uid and gid of anonymous user. Usually this feature is used if one wants all users accessing to seem like 1 user.
5.3 Service - AFP/Atalk
The Apple Filing Protocol (AFP)
Use this sub-menu to access the control panel to manage client access to the Apple Talk Service. 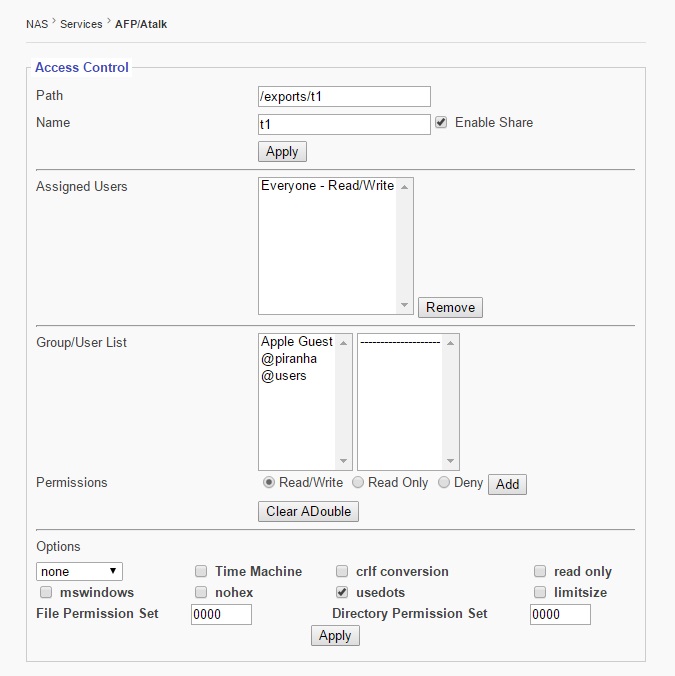
Path
Use this function to set the location of the share.
Name
Use this function to name the share. The adjacent option box enables or disables the share.
Assigned Users
This window displays users who have been granted access to the share.
User/Group List & Permissions
This window displays all available users who can be granted access to the share. To grant a user access, click on their name and chose an option of: “Read/Write, Read Only, or Deny.” To save change, click “add.”
Options
Drop down bar
None-No changes will be made
Tolower- forces all names to be lower case for both directions of the share.
Toupper- forces all names to be upper case for both directions of the share.
Xlatelower- AFP client sees lower case and client sees upper case
Xlateupper- AFP client sees upper case and client sees lower case
Mswindows- checking this option box improves performance for Windows NT, 2000 and 2003 systems.
Prodos- This function improves communication with Legacy Apple II OS.
CRLF Conversion- This feature converts line feeds and carriage returns from UNIX to Windows and AFP compatible formats.
Read Only- This option forces read only communication
Nohex- This option disables hex translations for all files but DOT files
Usedots- This option shows file names with configurations that begin with “.”
Limitsize- This option limits each file to a 2GB maximum.
File/Directory Permissions Set- Sets default permissions for users accessing files via: AFP.
Follow this format:
A code is used with this format “0” followed by 3 numbers. (0XXX).
The first X refers to the owner of the file/directory.
The Second X refers to the group assigned to the file/directory
The third X refers to other users assigned to the file/directory
These numbers “X” Can take a total of 6 values.
4- Read Only
2- Write Only
1—Execute Only
5 (4+1) Read and Execute Only
6 (4+2) Read and Write Only
7 (4+2+1) Read, Execute, and Write
Example
0742
Owner has all rights
Group assigned can read only
Other groups can write only

5.4 Service - iSCSI Target page: iSCSI Target Service Management
This sub menu displays the settings to enable/disable access via iSCSI. 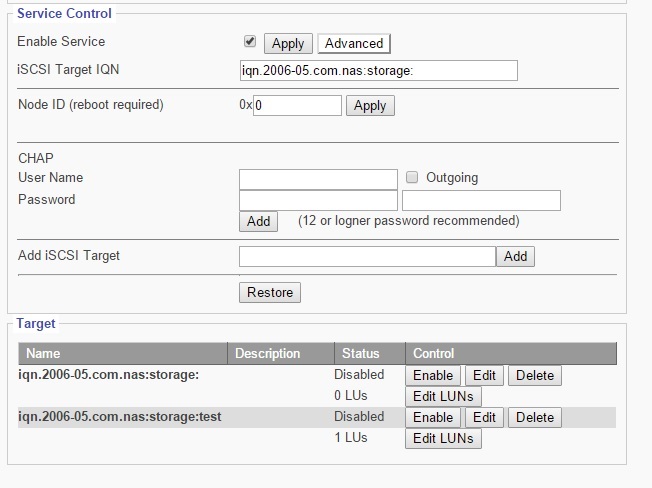
Enable Service
This option box enables iSCSI service when checked.
Target IQN
Shows the IQN of iSCSI target.
Node ID
Up to 8 digits, used to avoid having the same ID generated by VMWare ESX hosts when multiple EliteNAS systems are used on the same network.
CHAP Configuration
User Name: Enter the desired user name.
Password: Enter the desired password, re-enter in the second text box to confirm correct password.
Outgoing: Use this feature for mutual CHAP authentication.
Add: Saves changes of CHAP.
Add iSCSI Target
This feature is used to create a new iSCSI target IQN.
To add iSCSI target:
1.Click “Advanced” to open “add iSCSI” option.
2.Copy “iSCSI Target IQN.”
3.Paste “iSCSI Target IQN” into “Add iSCSI Target” Text box
4.Enter a name after the IQN Target (ie. iqn.2006-05.com.nas:storage:backup)
5.Click “Add” to save changes.
Restore
Use this function to restart SCST services. This helps restore connection with existing iSCSI targets.
Target
Enable/Disable- used to grant/prevent access to iSCSI Target
Edit- Use this function to edit iSCSI target functions:. IQN Name, IQN Description, CHAP controls, Host IP Block, and Logical Volumes Assignments.
Edit LUNS- Used to manage block-type logical volume access via iSCSI Target
Edit LUNS 
Target- shows iSCSI Target selected for editing.
Options- Grants permission to write or read only.
Access Control- Used to add/delete initiators from EliteNAS.
Volumes- displays current Logical Volumes assigned to this target.
Logical Volumes- To add LUN, enter a LUN number and click “add.” Entry will now be visible on the “Volumes” box.
5.5 Service - Replication page:
This sub-menu displays the settings to configure EliteNAS to replicate to another remote EliteNAS system. 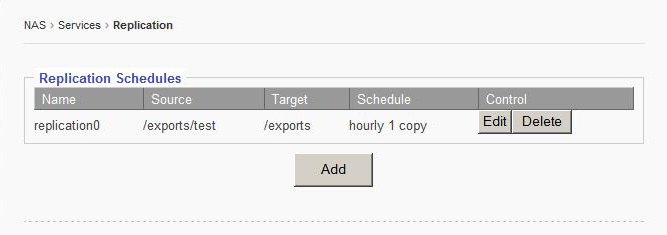
5.5.1 Adding a new Replication Schedule
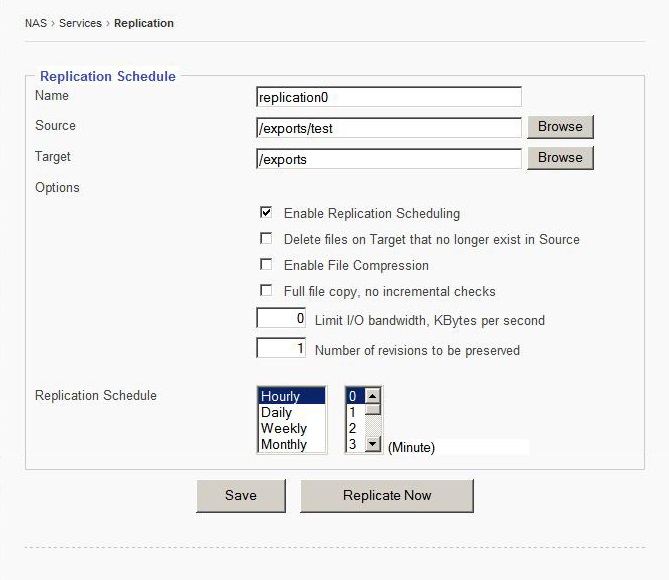
Click “add” button to access the Replication Schedule editor screen.
Name- Set name for replication job.
Source- click “browse” to find source volume.
Target- click “browse” to find target volume.
Enable the “Enable Replication Scheduling” option.
Enable the “Delete files on Target that no longer exist in Source” option
Enable the “File Compression” option if so desired.
Enable the “Full File Copy, No Incremental Checks” option if desired.
Enter a value for bandwidth limitation if so desired.
Enter the number of revisions desired.
Set desired Replication Schedule
Click “save” to apply changes.
5.6 Service - Snapshot page
This sub menu allows for managing of scheduled snapshot services. 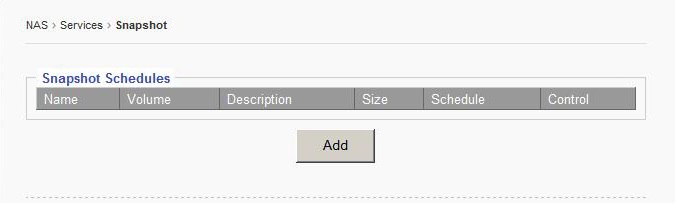
5.6.1 Adding new Snapshot Schedule
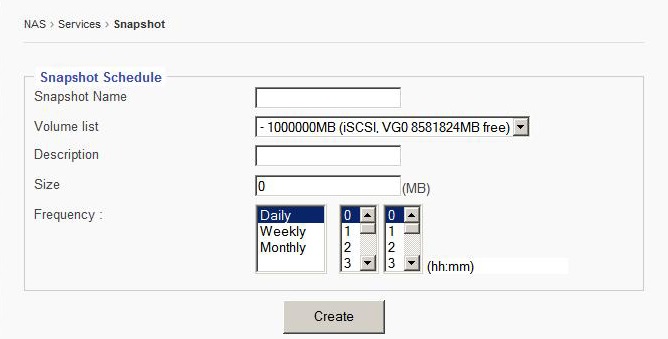
Snapshot Name- Enter desired name of snapshot schedule.
Volume List- Select the desired volume from the drop down menu.
Description- Enter a description for the snapshot schedule to aid in identification.
Size- Enter the desired snapshot size.
Frequency- Set the desired frequency of snapshots.
Click “Create” to save changes and add the new Snapshot schedule.
5.7 Service - Access Control page:
This sub menu houses the settings to control user access to shared file directories/ group permissions. 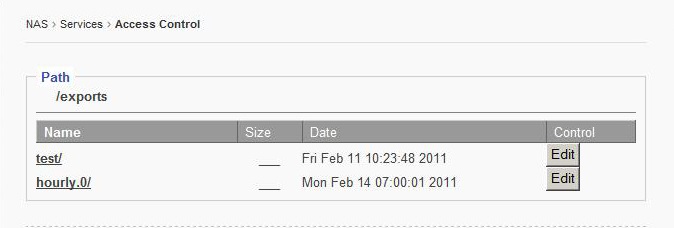
5.7.1 Edit
Use this button to open menu to configure user access controls. 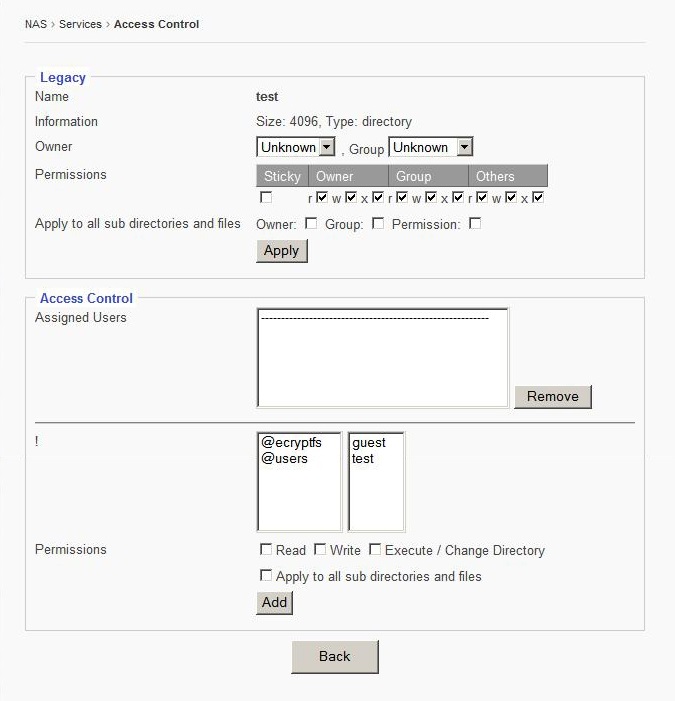
Name
Displays the user that is being edited.
Owner
Drop down menu that sets the owner of the share.
Group
Drop down menu that sets a group to assign user to.
Search User/Group
Feature used to search for a specific user or group.
Permissions
Used to set certain permissions granted to owner, group, others, or sticky.
Apply to all sub directories and files
Used to chose whom is affected by changes in settings.
Assigned users
This window displays all users assigned.
Group/User List
This window displays each user and group.
Permissions
Used to set permissions for slected users or groups.
5.8 Tape Backup
This page displays the settings to manage tape backups. 
Name
Enter desired name of backup policy.
Source
Select the source directory
Target
Select device where backup will be written.
Software Compression
Enable this option to turn on software compression.
Hardware Compression
Enable this option to turn on hardware compression
Schedule
Set the desired schedule of backup frequency.
5.9 Cloud Backup

Services
Select service provider for Cloud Backup service
Name
Enter the desired name of the backup.
Source Directory
Choose a source directory from the browse list.
Target Directory
Choose a target directory from the browse list.
Delete deleted files
Checking this option box deletes files that have been deleted.
Checkers
Enter number of checkers to run in parallel.
Transfers
Enter number of file transfers to run in parallel.
Schedule
Check this option box to enable cloud backup scheduling.
Enter schedule desired for cloud backup.