“Features” entry consists of the following sub-menu entries/pages: 
6.1 FTP Service Management
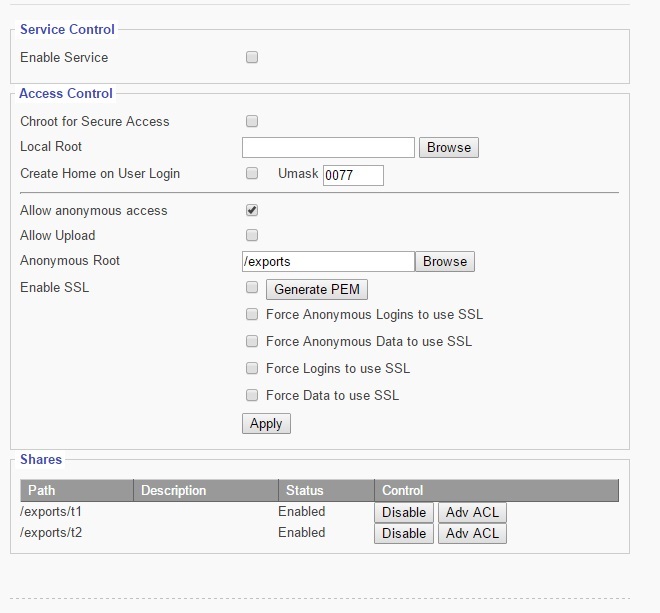 Enable Service
This check option box enables FTP Service.
Create Home on User Login
Enabling this feature automatically creates a “home” folder for the user.
Allow Anonymous Access
Enabling this feature grants anonymous users access to the FTP folder.
Allow Upload
Enabling this feature allows users to upload files to the FTP folder.
Anonymous Root
Use the browse button to select a location for the Anonymous Root folder.
Enable SSL
Enables SSL encrypted communication between User and FTP Service
Generate PEM-Generates certificate for SSL service.
Force Anonymous Logins to use SSL- Forces Anonymous Users to only access via SSL.
Force Anonymous Data to use SSL- Forces data transmissions to be logged as “Anonymous” User on FTP.
Force Logins to use SSL- Forces all logins to use SSL encryption.
Force Data to use SSL- Forces all data to use SSL encryption.
Enable/Disable FTP Shares
Click the button to enable/disable FTP Shares.
6.2 DHCP Management
This sub menu contains the options for configuring the DHCP Service 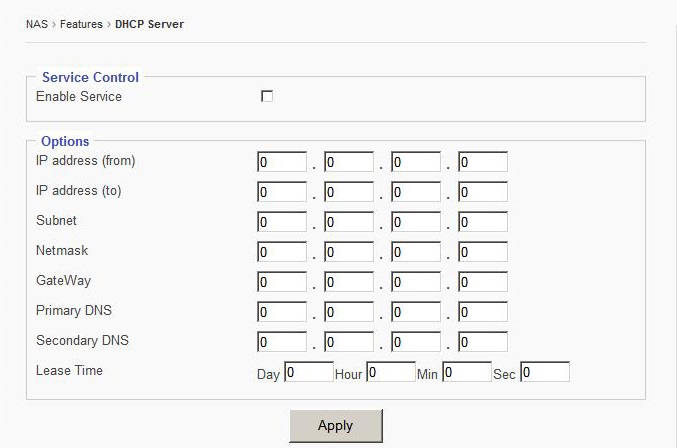
Enter IP address range that will be given to clients.
Enter a desired subnet mask IP
Enter a desired netmask IP
Enter a desired Gateway IP
-
Enter the Secondary
DNS IP
Enter the length of lease term desired.
Select Apply to save changes.
6.3 Network Time Service Management
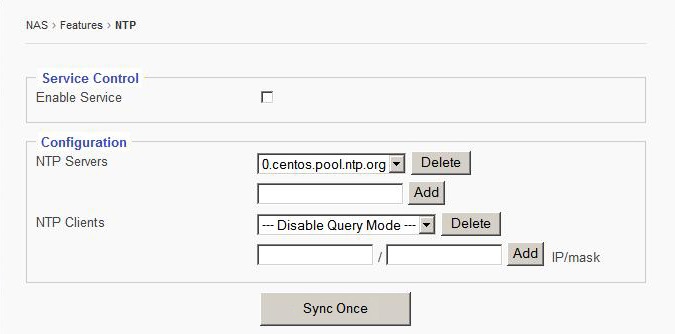
To enable NTP Service:
Check the “Enable Service” option box.
Select a pre-existing NTP Server or add a new NTP server by entering its IP address and subnet fields and clicking ‘add.”
Click the “Sync Once” button sync NTP Service with the NTP Server.
Add/Remove NTP Clients
Enter IP address of client
Click “add” to add client, click “delete” to remove client.
Click the “Sync Once” button to sync NTP Service with the NTP Server.
6.4 UPNP
UPNP stands for Universal Plug and Play, this feature allows users to see each other’s presences on the network for data sharing. 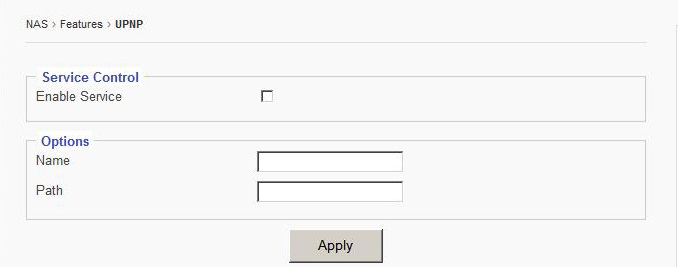
To Enable UPNP:
Check “Enable Service” option box.
Enter a desired “name” of share.
Enter desired “path” of the share.
Click “Apply” to save changes.
6.5 DDNS Management
This page displays the menu for configuring the DDNS Service 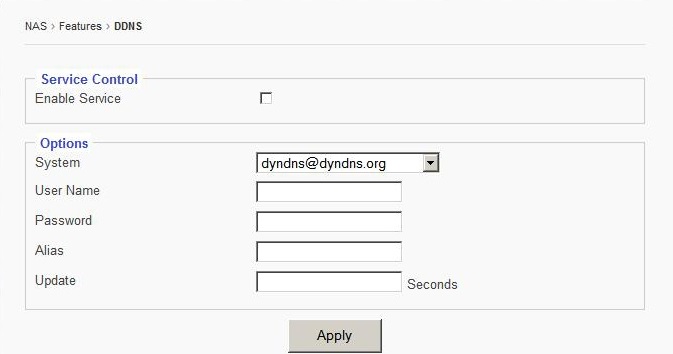
To enable DDNS Service:
Check the “Enable Service” option box.
Select a service via the drop down menu.
Enter a desired username for the DDNS Service Account
Enter a desired password for the DDNS Service Account.
Enter a DDNS Alias
Enter a DDNS Update frequency (seconds)
6.6 Remote Access Management
This page displays the settings for configuring Remote Access. 
Enable Web GUI Access
Select this option box to enable web browser access to the Graphical User Interface.
Enable Web GUI HTTPS Access
Select this option box to enable secure browser access to the Graphical User Interface.
Enable Telnet Access
Select this option box to enable access via Telnet connections.
Enable Web HDD Access
Allows users to access their own folder via Web GUI instead of FTP or SMB.
SCP Access
Selecting this option box directs the use of a Secure Copy access
SFTP Access
Enable this option for Secure File Transfer Protocol access.